Avada Studio is an expansive library of multi-use content blocks professionally designed to speed up your web design workflow. In addition, Avada’s intuitive interface makes it easy for you to live preview any content before importing directly into your content with a click.
The Avada Studio is, by design, a creative resource for anyone building a website with Avada and is intended to give you a head start when creating website content and layouts.
Newly Released Studio Content Blocks
This collection showcases the most recent content blocks released by our team and follows from this previous article [COLLECTION 27]. All content is ready to import into your website with a click of a button.
It is essential to note that you are not limited to how and where the content can be used within your Avada website with each content item being very flexible and ready integrate into your layouts.
Containers
Columns
Forms
Post Cards
Studio content is neatly organized into a range of categories making it straightforward to search through, view, and then import into your workflow.
The Benefits Of Prebuilt Content
Studio content is prebuilt for anyone creating a website with the Avada Website Builder. All content is effortlessly customizable and intended to integrate into your website content and layouts seamlessly.
How To Get Started
Accessing and importing prebuilt content is straightforward if you are already using Avada for your website, and it is done via the WordPress Dashboard. We encourage you to take look at this detailed help file and video explaining how to use the Avada Studio.
If you are new to WordPress and want to explore the power to build a successful website with the Avada Website Builder and prebuilt content, you can do so here.
Avada Studio is an expansive library of multi-use content blocks professionally designed to speed up your web design workflow. In addition, Avada’s intuitive interface makes it easy for you to live preview any content before importing directly into your content with a click.
The Avada Studio is, by design, a creative resource for anyone building a website with Avada and is intended to give you a head start when creating website content and layouts.
Newly Released Studio Content Blocks
This collection showcases the most recent content blocks released by our team and follows from this previous article [COLLECTION 26]. All content is ready to import into your website with a click of a button.
It is essential to note that you are not limited to how and where the content can be used within your Avada website with each content item being very flexible and ready integrate into your layouts.
Templates
Containers
Columns
Post Cards
Studio content is neatly organized into a range of categories making it straightforward to search through, view, and then import into your workflow.
The Benefits Of Prebuilt Content
Studio content is prebuilt for anyone creating a website with the Avada Website Builder. All content is effortlessly customizable and intended to integrate into your website content and layouts seamlessly.
How To Get Started
Accessing and importing prebuilt content is straightforward if you are already using Avada for your website, and it is done via the WordPress Dashboard. We encourage you to take look at this detailed help file and video explaining how to use the Avada Studio.
If you are new to WordPress and want to explore the power to build a successful website with the Avada Website Builder and prebuilt content, you can do so here.
Avada Studio is an expansive library of multi-use content blocks professionally designed to speed up your web design workflow. In addition, Avada’s intuitive interface makes it easy for you to live preview any content before importing directly into your content with a click.
The Avada Studio is, by design, a creative resource for anyone building a website with Avada and is intended to give you a head start when creating website content and layouts.
Newly Released Studio Content Blocks
This collection showcases the most recent content blocks released by our team and follows from this previous article [COLLECTION 25]. All content is ready to import into your website with a click of a button.
It is essential to note that you are not limited to how and where the content can be used within your Avada website with each content item being very flexible and ready integrate into your layouts.
Templates
Page Title Bars
Columns
Elements
Icons
Off Canvas
Mega Menus
Studio content is neatly organized into a range of categories making it straightforward to search through, view, and then import into your workflow.
The Benefits Of Prebuilt Content
Studio content is prebuilt for anyone creating a website with the Avada Website Builder. All content is effortlessly customizable and intended to integrate into your website content and layouts seamlessly.
How To Get Started
Accessing and importing prebuilt content is straightforward if you are already using Avada for your website, and it is done via the WordPress Dashboard. We encourage you to take look at this detailed help file and video explaining how to use the Avada Studio.
If you are new to WordPress and want to explore the power to build a successful website with the Avada Website Builder and prebuilt content, you can do so here.
Avada Studio is a creative resource library for Avada website owners that provides access to professionally designed content for your website. Whether building a new website or enhancing an existing one, Avada Studio offers a wide range of pre-built content that can be effortlessly integrated into your website with a few clicks.
In a previous post, we demonstrated how to add Avada Studio content to your website. This post will cover a step-by-step guide to adding a template to an existing page. Let’s get started!
Overview
What Is Avada Studio?
Avada Studio is a creative resource for Avada websites that provides users with a library of professionally designed, pre-built content that can be imported into any Avada website. These elements, which include sections, layouts, templates, headers, footers, and more, are designed to help users quickly build and customize their websites without starting from scratch.
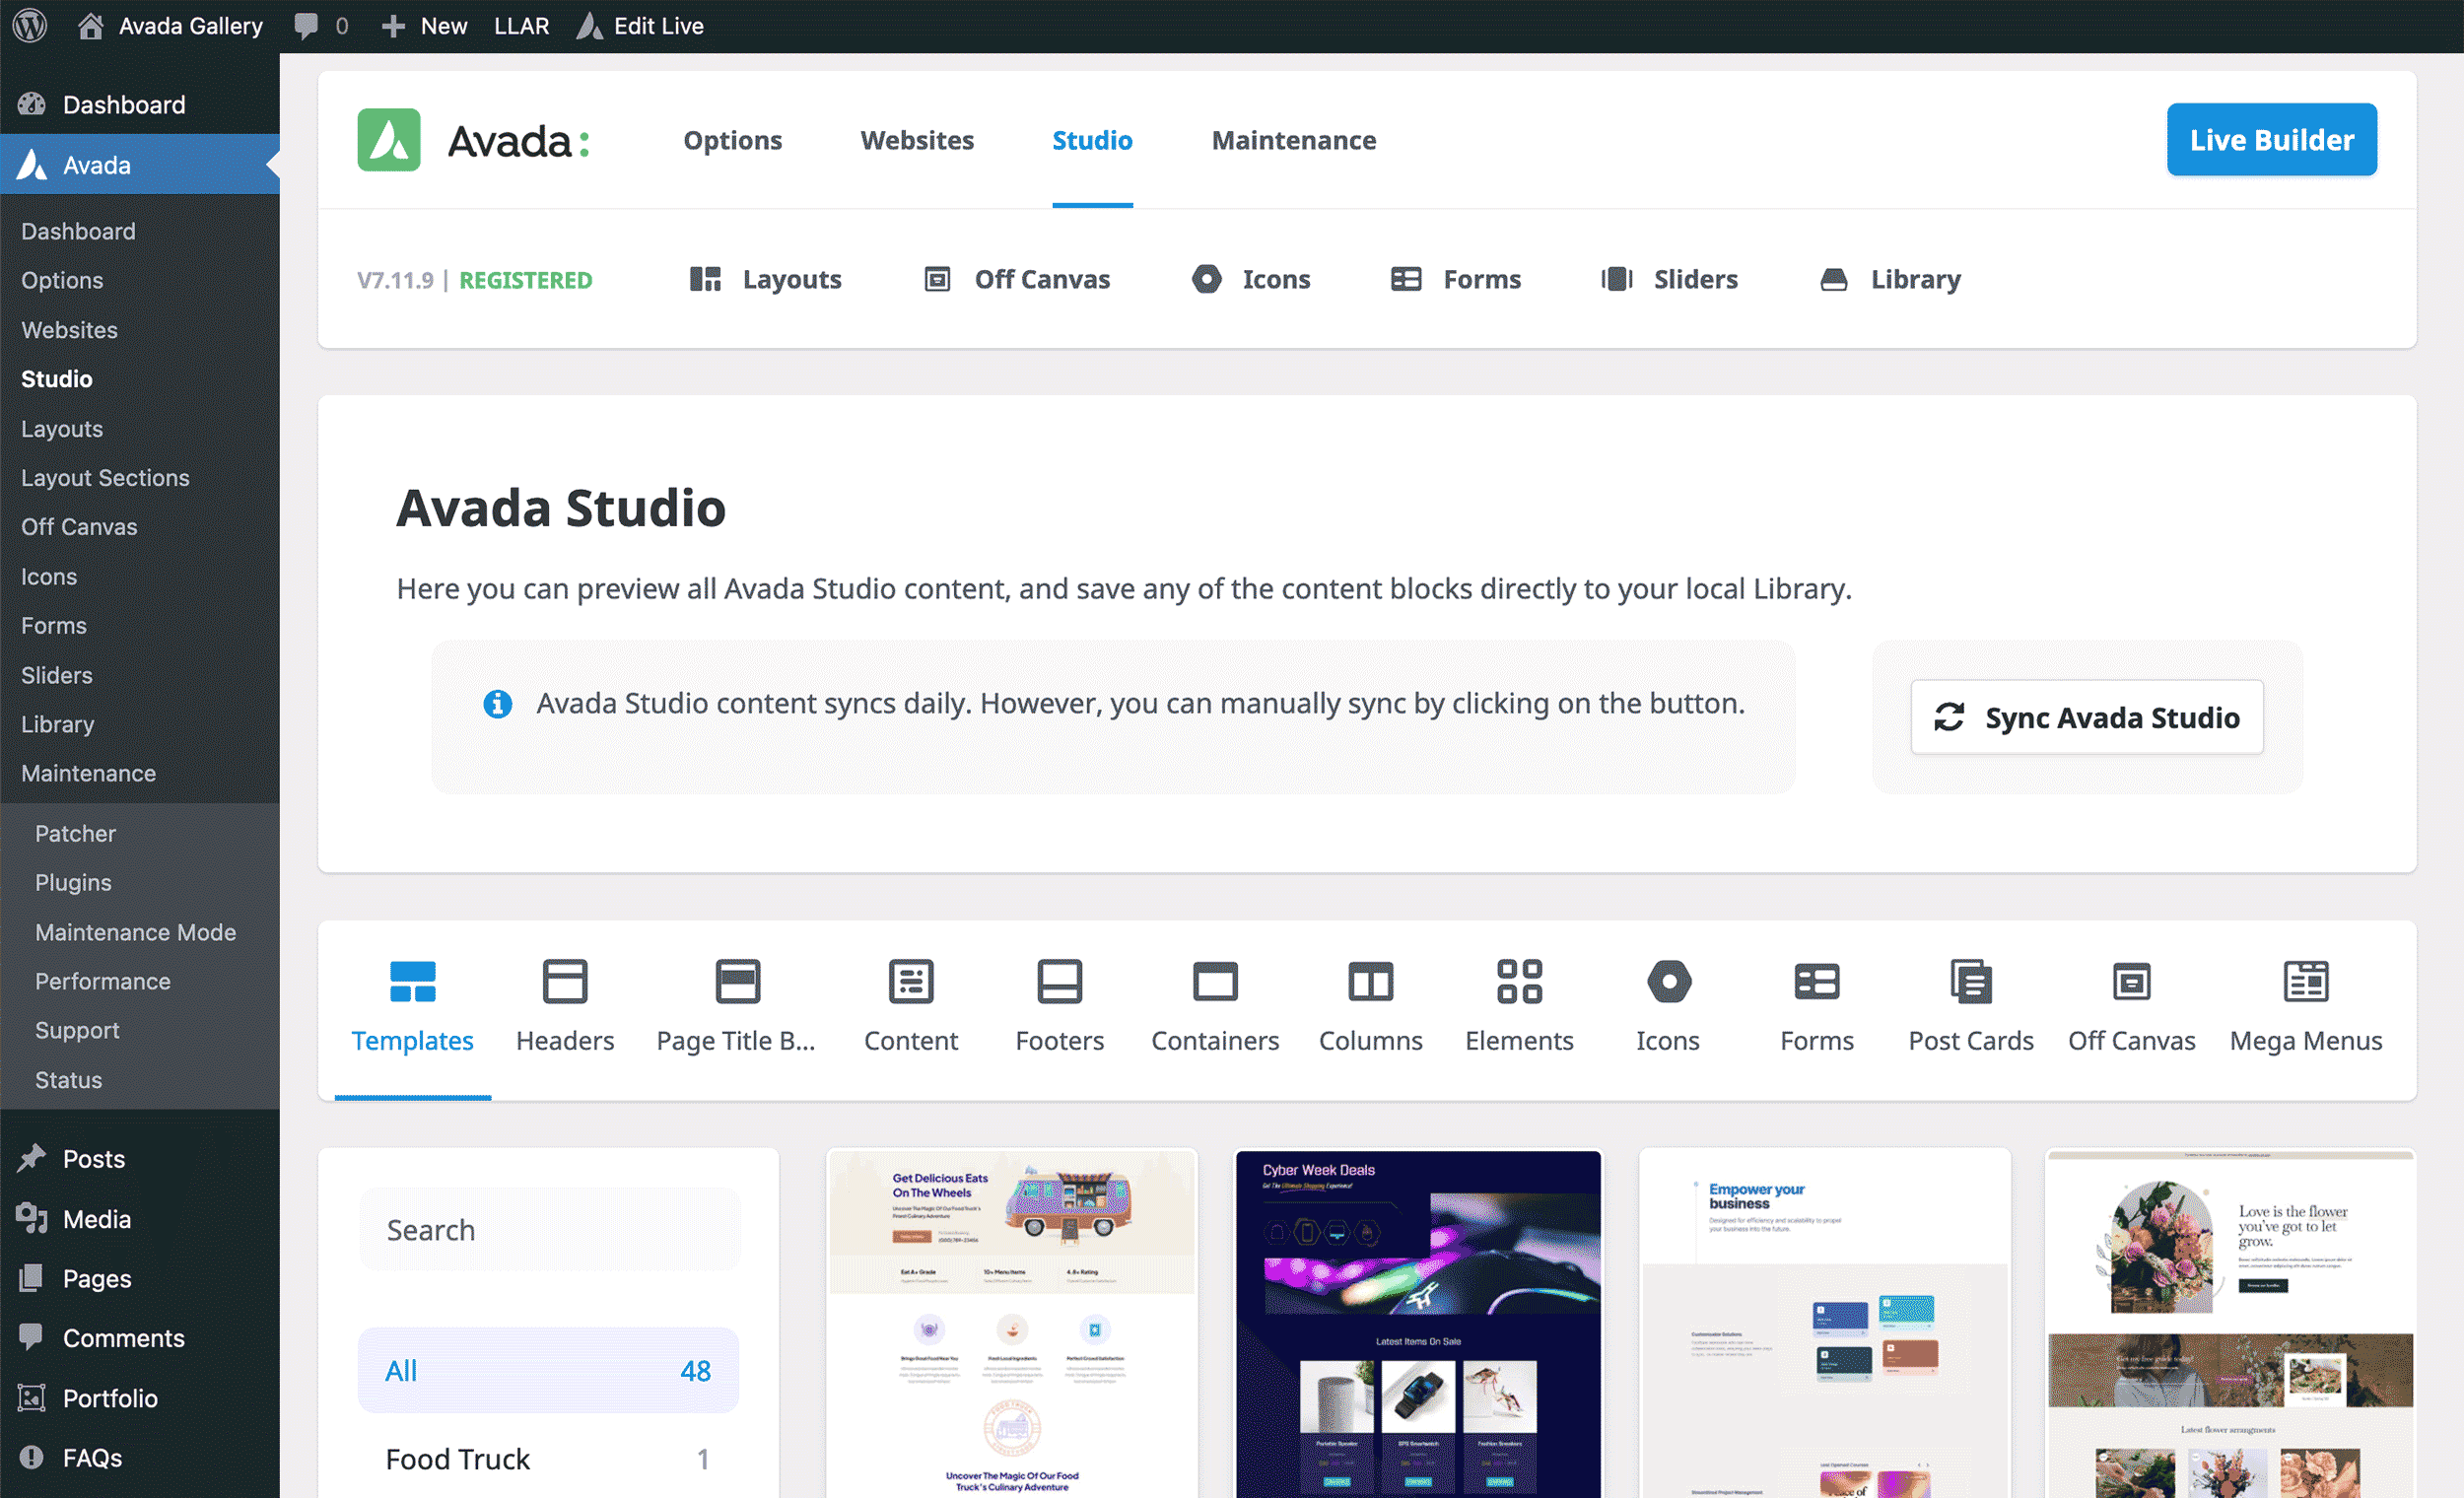
How To Access Avada Studio Content
Log into your Avada website Dashboard and navigate to Avada > Studio. Here, you’ll find a wide variety of content categorized for different uses, which can be imported with a click and customized to suit your specific needs.
Customizing Avada Studio Content
Customizing Avada Studio content to enhance or build a new website could not be easier. Avada allows you to seamlessly integrate beautifully designed content into your website while customizing it to match your brand’s unique style. You’re not limited to the pre-built designs—every aspect of the imported content can be modified to fit your needs.
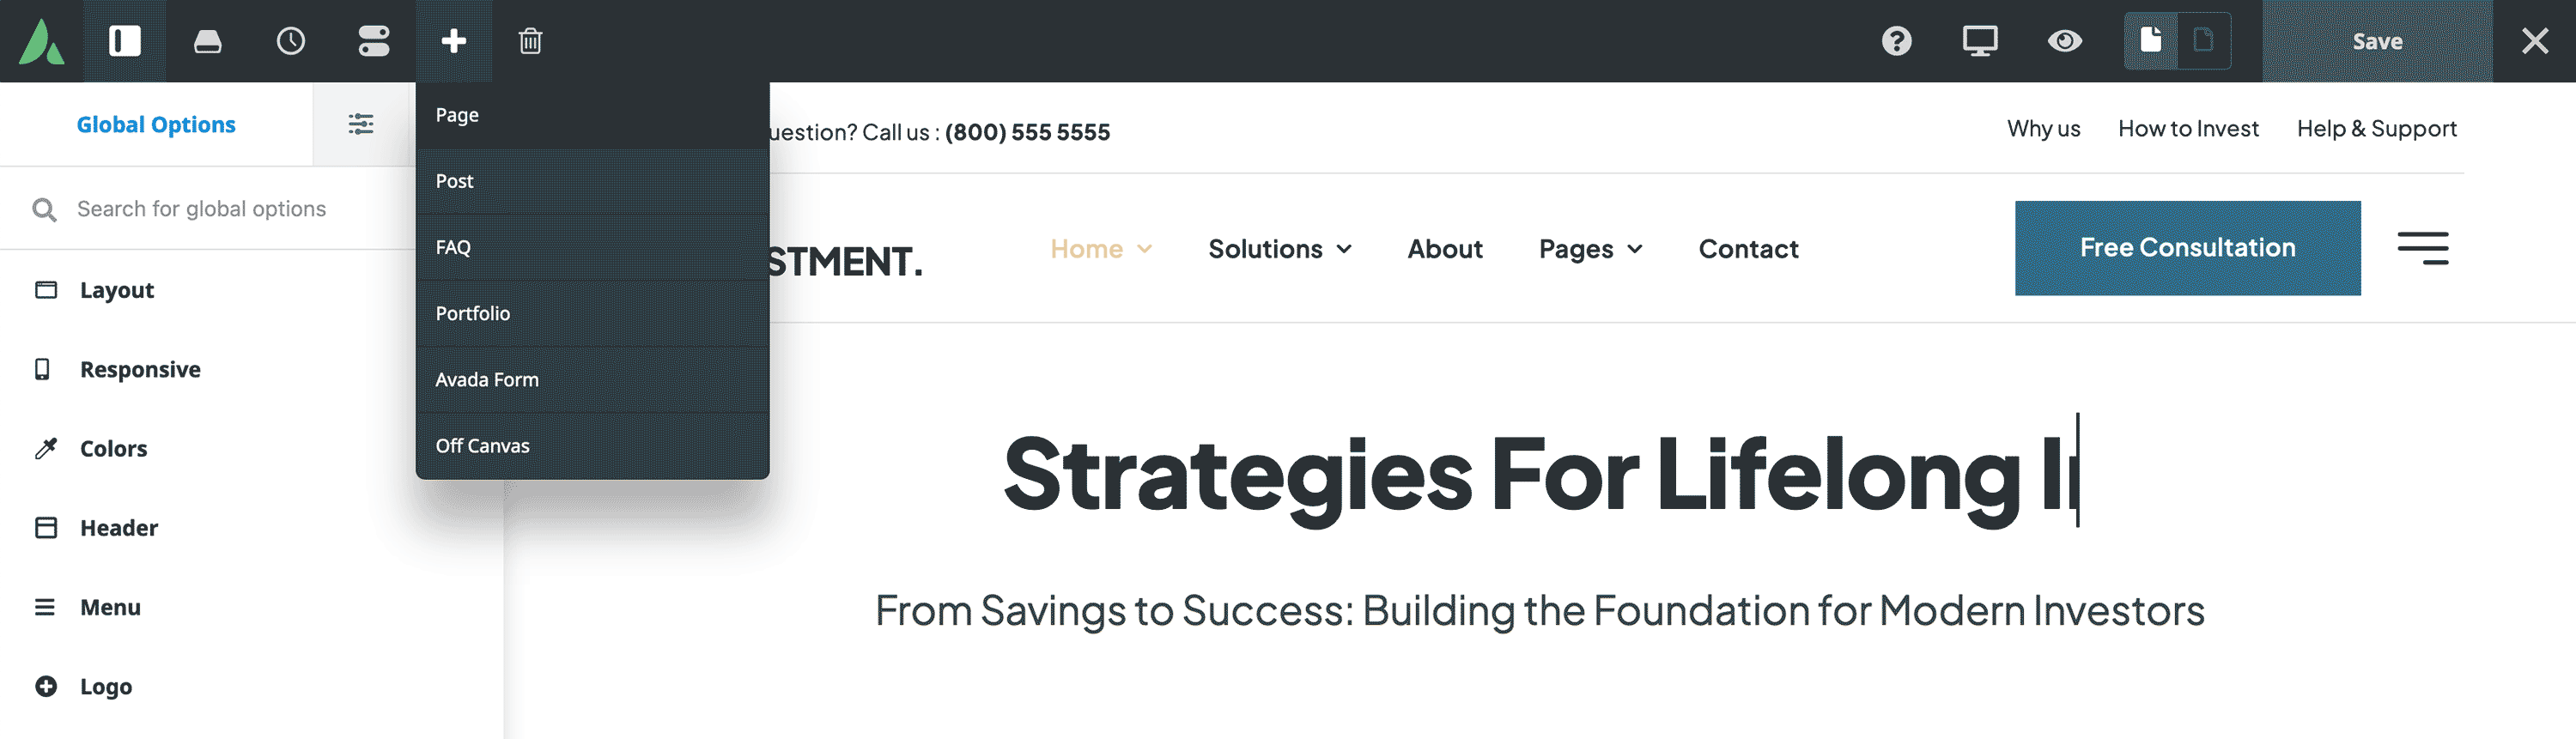
Step 1: Create A New Blank Web Page
There are two ways to create a new web page or post. (A) Log into your website and navigate to WordPress Dashboard > Pages, or (B) edit the site using the Avada Live Builder, click on the + icon, and then “Add New” in the top toolbar.
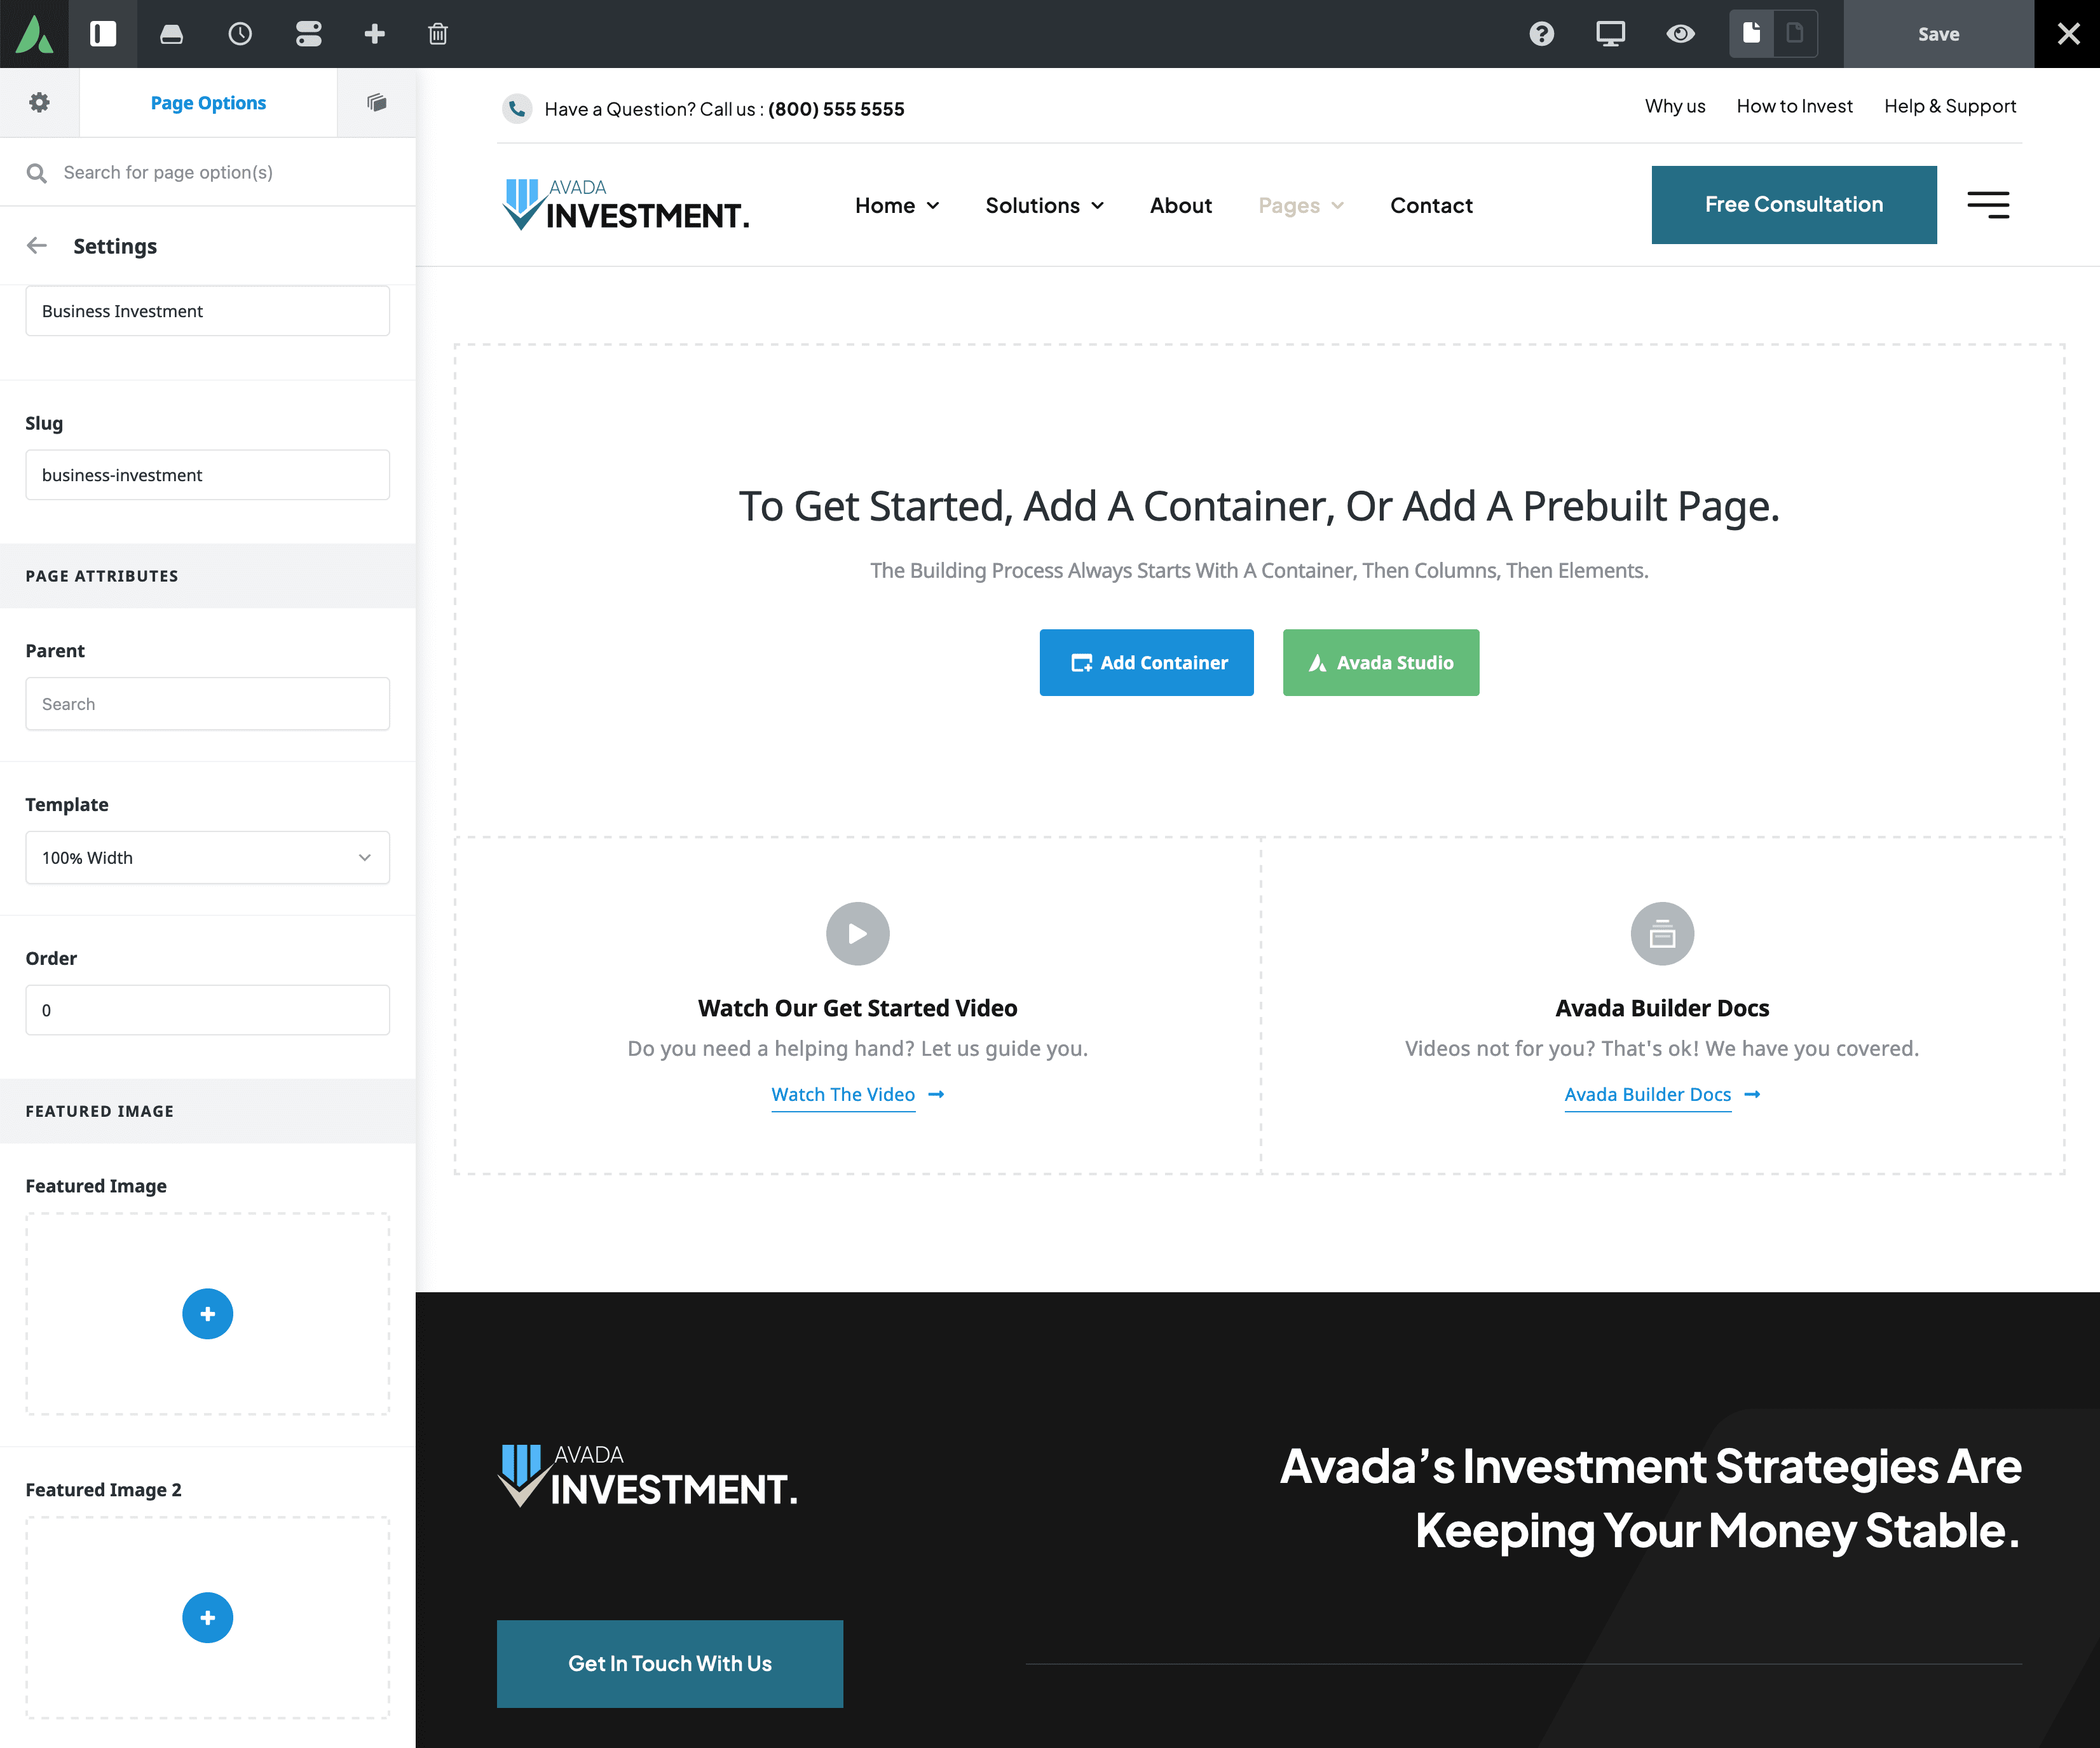
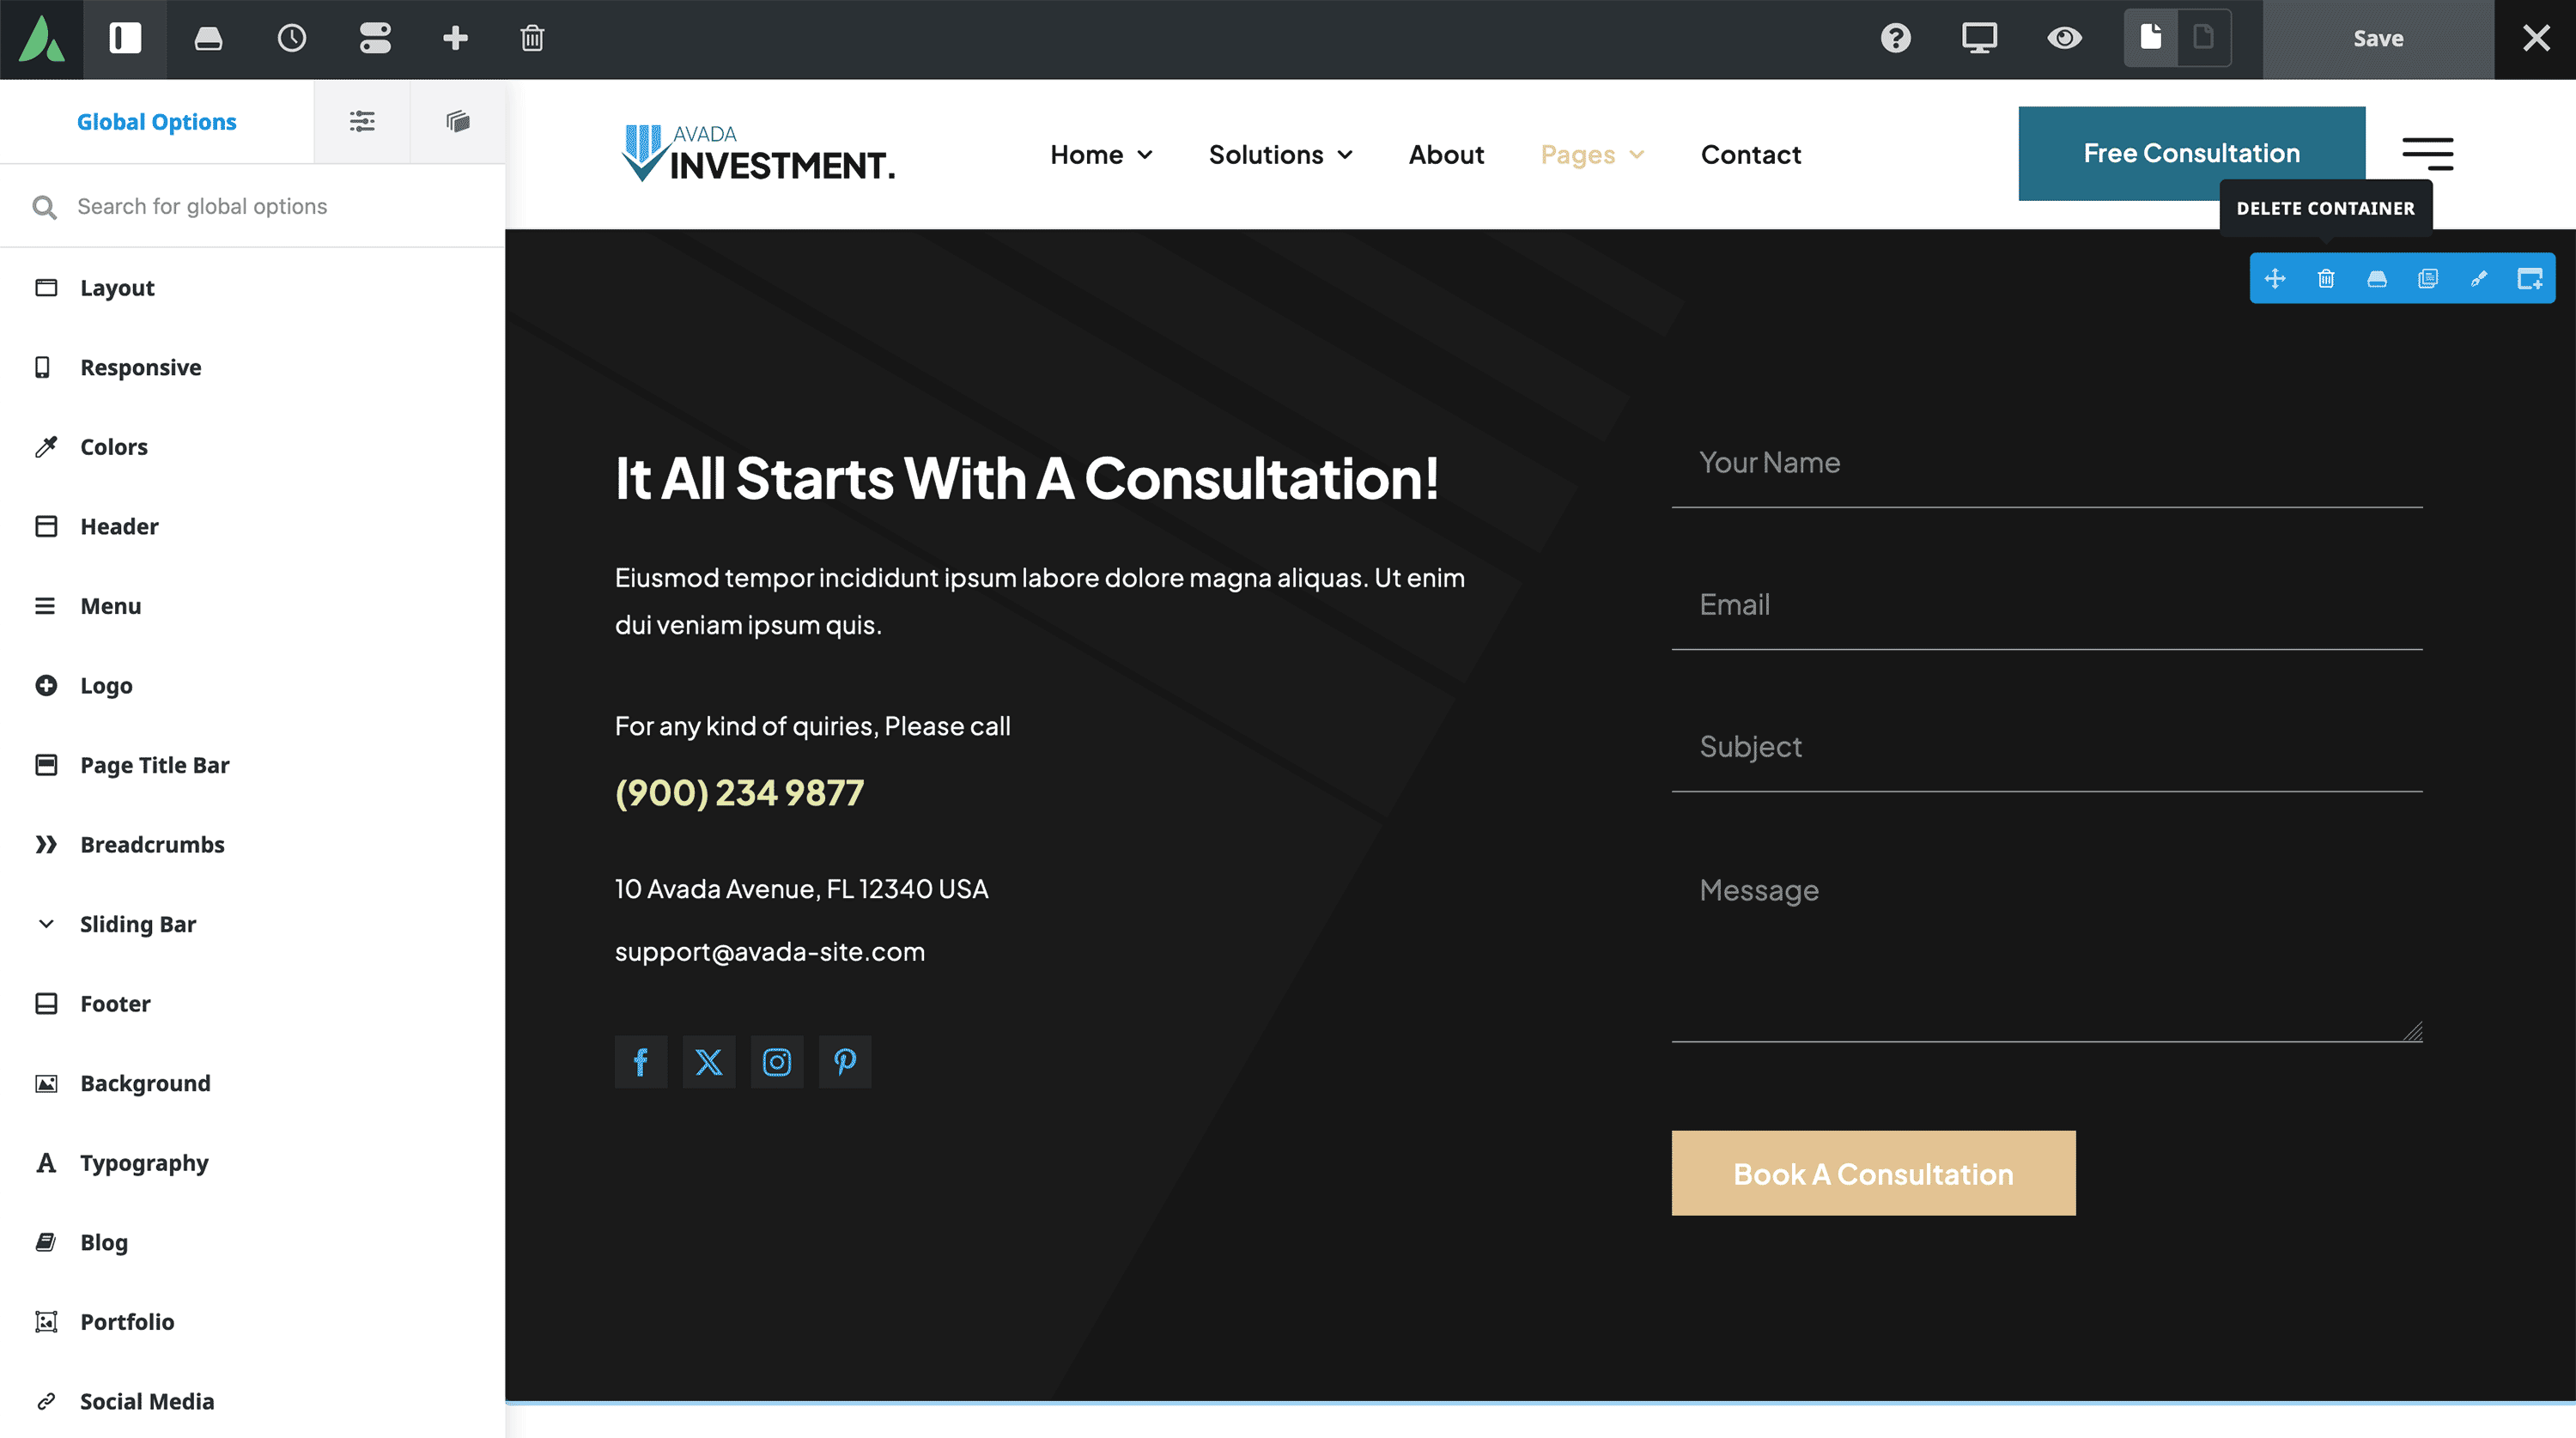
For our example (video), we have used the Avada Investment website and created a blank page named “Business Investment.”

At this point, the page is empty, using only the global header and footer settings from the site’s layout.
Step 2: Access Avada Studio
Once the blank page is set up, the next step is to add the desired template from the Avada Studio library. Users can access a wide range of pre-built content by clicking on the Avada Studio link within the editor.
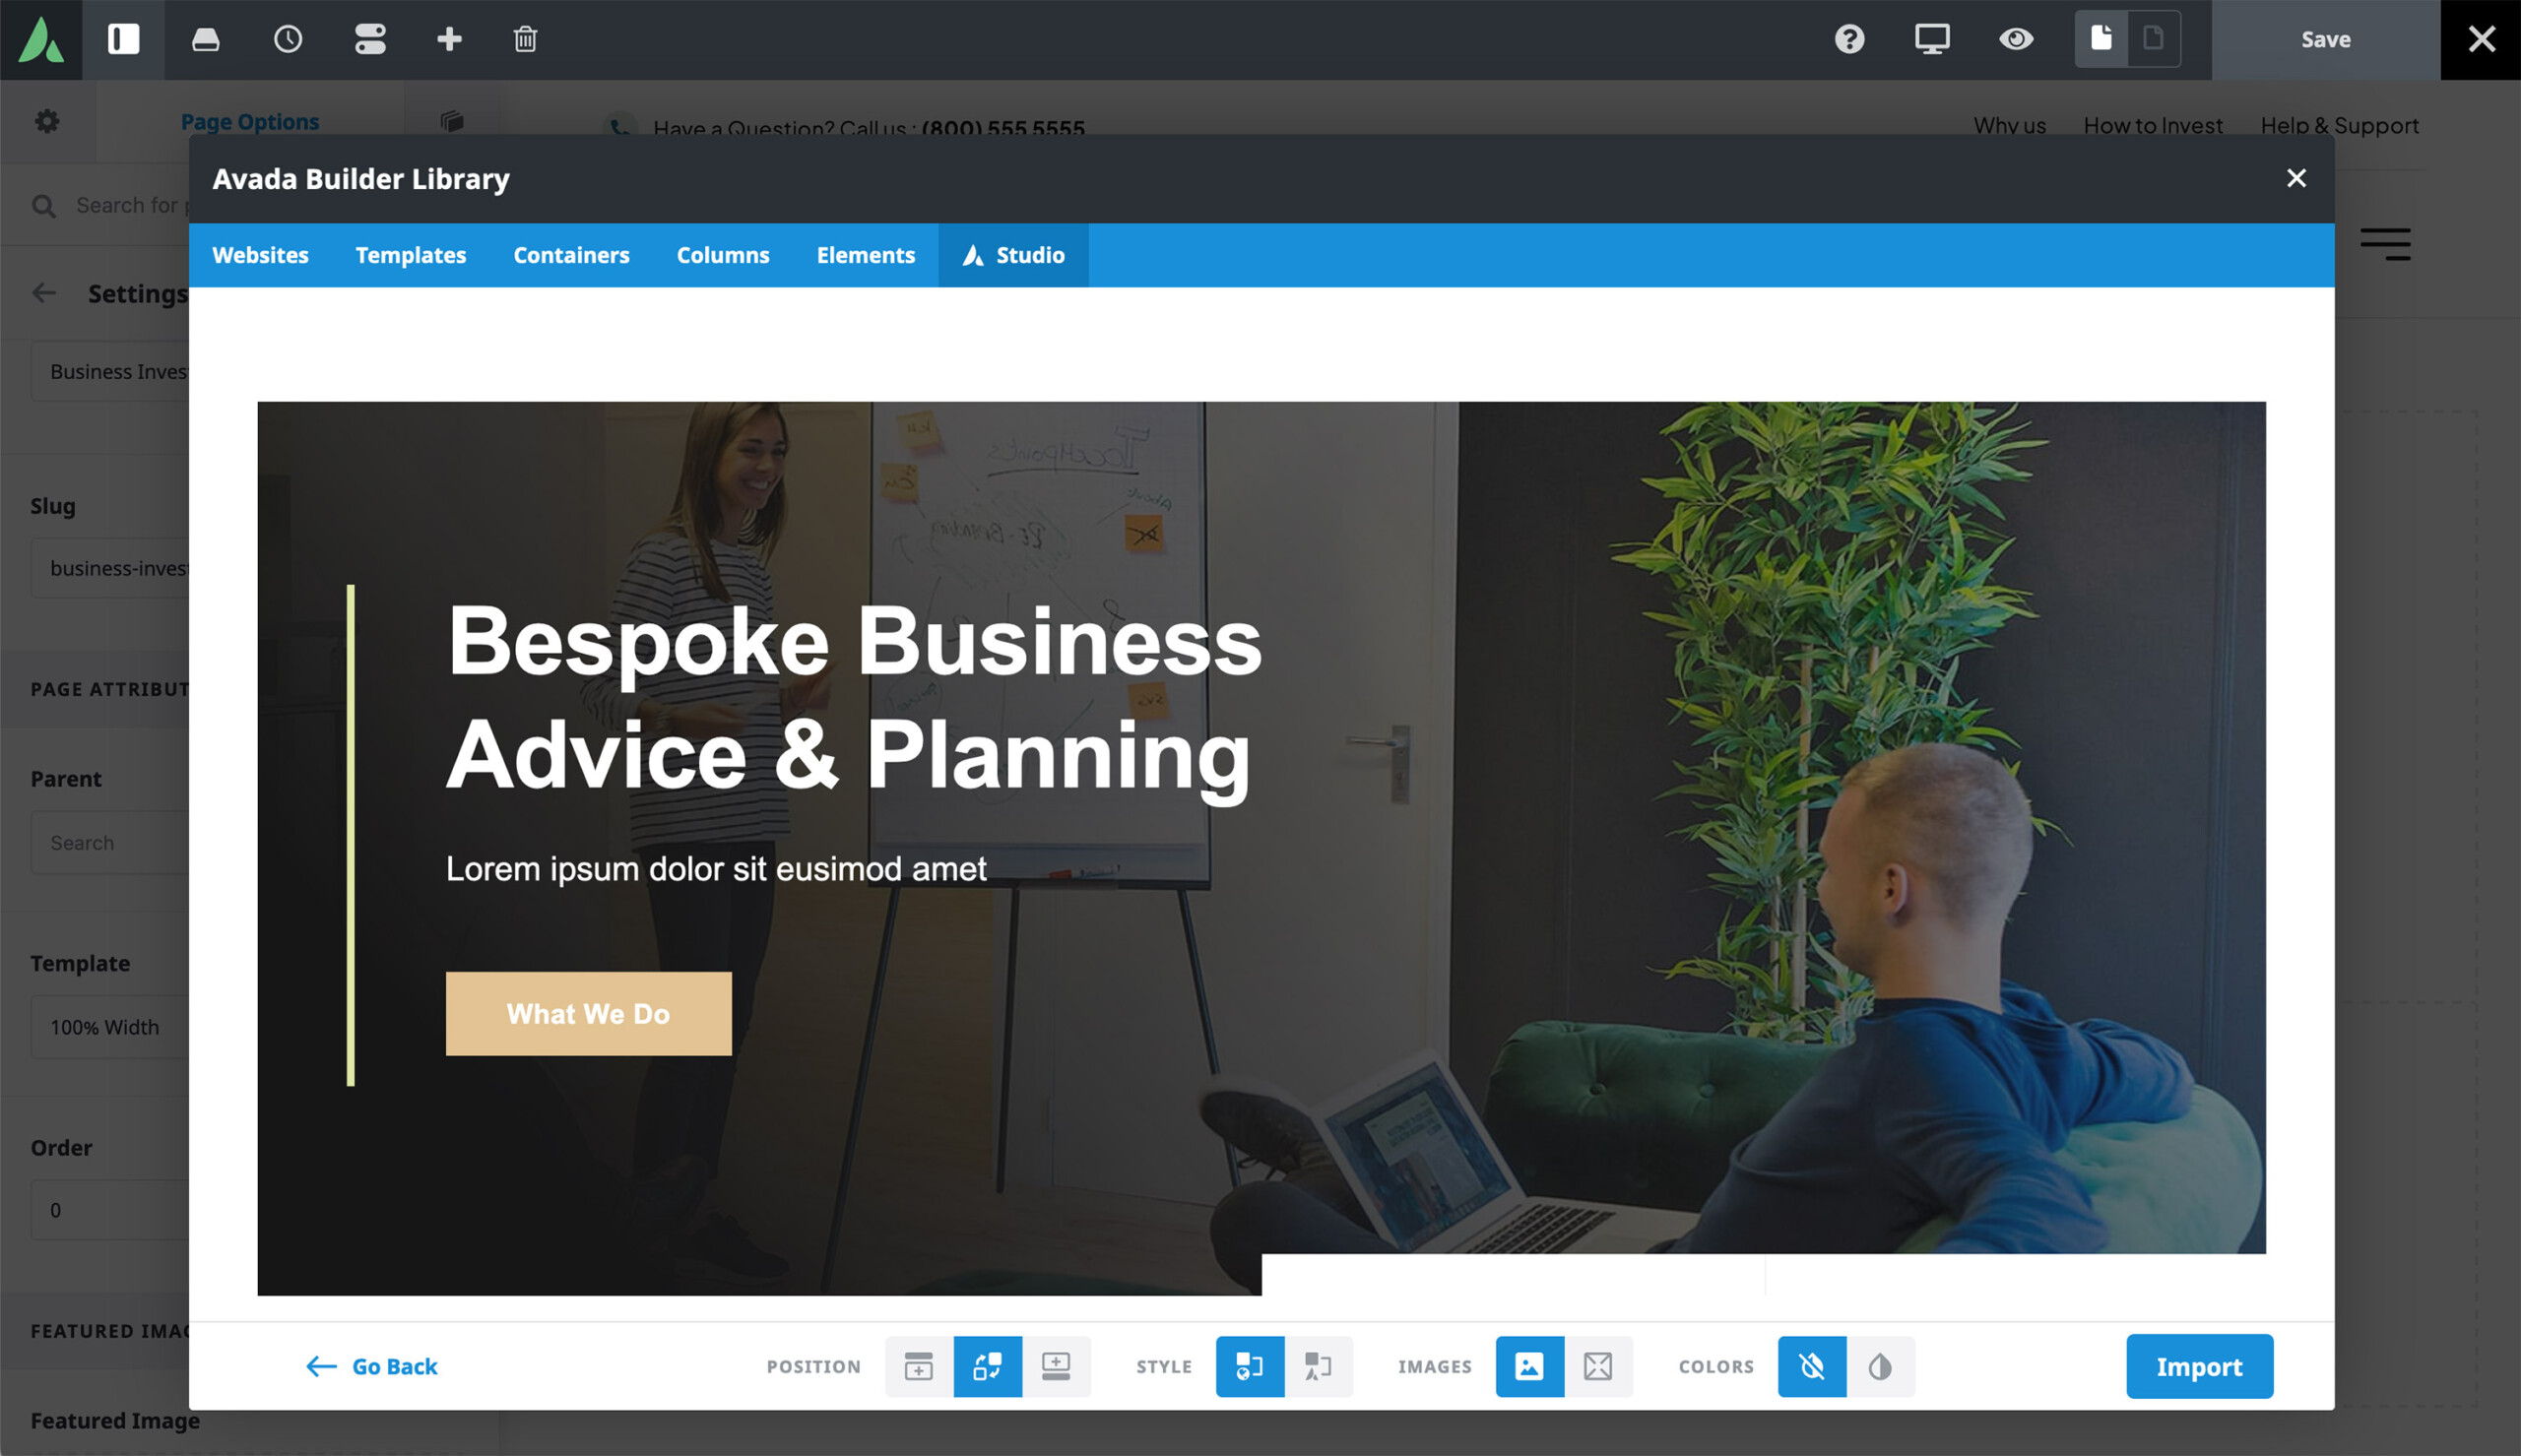
Step 3: Choose, Preview & Import the Template
Avada Studio offers over 574 predesigned items with almost 50 full-page design options, which can be filtered by category. In our example, we selected the "Business and Finance" template (#3157). Before importing the template, you can preview it and adjust the settings based on your preferences.

Step 4: Adjust The Template Import Settings
There are several customizable options you can adjust before importing any Avada Studio content:
Step 5: Import The Template
After selecting the desired settings, click “Import.” Within a few seconds, the imported content will be added to the page. From here, we can start customizing the content to suit your needs.
Step 6: Customizing The Content
Once the template content is imported, you have complete creative control to customize or add/remove as much of the content as needed. For example, our imported template includes a footer section at the bottom. Because our existing site already has a global footer, we deleted the extra footer container layout.
Final Thoughts
If more content is needed, additional sections can be added by importing from the Avada Studio. Or, create your own from scratch using the vast array of Avada Design Elements. At this stage, all that’s left is to replace the placeholder text and images with custom content.
Avada Studio is a creative resource for Avada website owners that provides access to professionally designed content for your website, which has never been easier. Whether you’re building a new site or enhancing an existing one, Avada Studio offers a wide range of prebuilt content that can be effortlessly integrated into your website with a few clicks.
In a previous post, we demonstrated how to add and customize an Avada Post Card to your website. In this post, we will demonstrate how to add and customize a 404 page template and a Blog single post layout. Let’s get started!
Overview
What Is Avada Studio?
Avada Studio is a creative resource for Avada websites, with a growing list of 574 professionally designed content blocks that can be imported into any Avada website. These elements, which include sections, layouts, templates, headers, footers, and more, are designed to help users quickly build and customize their websites without starting from scratch.
How To Access Avada Studio Content
Log into your Avada website Dashboard and navigate to Avada > Studio. Here, you’ll find a wide variety of content categorized for different uses, which can be imported with a click and customized to suit your specific needs.
Customizing Avada Studio Content
Customizing Avada Studio content could not be easier. Avada empowers you to seamlessly integrate beautifully designed content into your website while tailoring it to match your brand’s unique style. You’re not limited to the pre-built designs—every aspect of the imported content can be modified to fit your needs.
With the flexibility provided by Avada, you can quickly adjust colors, tweak typography, or reconfigure layouts import with a click and then move on to other important marketing tasks. Below, we will demonstrate this by customizing two assets: a 404 page template and a blog post layout.
Example 1: Updating a 404 Page Template
In the first example, we’ll replace the default 404 page of the Avada Hosting website with a prebuilt 404 page imported from the Avada Studio, demonstrating how to turn a default layout into an engaging and stylish page.

Step 1: Trigger a 404 Page
Start by intentionally triggering a 404 error on your site to see the current layout in action.
Step 2: Access Avada Layouts
Log into your website and navigate to Avada > Dashboard > Layouts page and locate the layout assigned to the 404 page.
Step 3: Edit the Content Layout Section
You have two options: create a new layout section or edit the existing one. For simplicity, let’s edit the existing layout section.
Step 4: Import a New Layout from Avada Studio
Click on Avada Studio and browse the available 404 page layouts. Select a design that appeals to you, preview it, and adjust the import options to match your site’s style. Import the chosen layout.
Step 5: Customize the Layout
Once imported, customize the layout to fit your website. For instance, you may need to adjust the menu, change the gradient colors, or edit the text to reflect your website’s style.
Step 6: Save and Publish
Save the layout after making the necessary adjustments.
Example 2: Refreshing a Blog Post Layout
In the second example, we’ll replace the default blog single post layout of the Avada Hosting website with a prebuilt single post layout imported from the Avada Studio, demonstrating how to turn a default layout into an engaging and stylish page.

Step 1: View the Existing Post
To view the current layout in action, go to the “Articles” page and click on any post to view the layout.
Step 2: Access the Blog Layout in Avada
Log into your website and navigate to Avada > Dashboard > Layouts page and locate the layout assigned to your blog posts.
Step 3: Edit the Content Layout Section
As with the first example, you can choose to edit the existing layout section or create a new one. For this example, we’ll edit the existing one.
Step 4: Import a Blog Post Layout from Avada Studio
Filter the available layouts to find one suitable for blog posts. Select and import the layout that best fits your desired look.
Step 5: Customize the Layout
Once imported, customize the layout as needed. You may need to adjust the image aspect ratios, modify column sizes, or tweak the typography to ensure the design integrates smoothly with your existing content.
Step 6: Save And Refresh
Save the layout and refresh your blog post to view the changes.
Summary
These two examples illustrate the versatility and ease of using Avada Studio content to enhance your website. Whether you’re updating specific pages or refreshing your overall design, Avada Studio’s prebuilt content provides a professional solution and is fully customizable. You can tailor the content to match your website’s unique brand and styling.
Avada Studio offers an impressive array of pre-designed content blocks that can be seamlessly integrated into your existing Avada website. One of the most versatile and visually appealing features is the Avada Post Card Element, which can display content from any custom post type (CPT) in various ways. This blog post will guide you through the process of adding an Avada Studio Post Card to an existing website, showcasing how easy it is to enhance your site with professional Avada Design Elements.
Overview
What Is Avada Studio?
Avada Studio is a creative resource for Avada websites that provides users with a library of professionally designed, pre-built content that can be imported into any Avada website. These elements, which include sections, layouts, templates, headers, footers, and more, are designed to help users quickly build and customize their websites without starting from scratch.
What Is An Avada Post Card?
An Avada Post Card is a Dynamic Content Element within Avada that allows you to display content from various custom post types, such as blog posts, portfolio items, or other content types, in a visually appealing and customizable format, and they are fully mobile responsive, ensuring your content looks great on any device.
It works by pulling content directly from your website’s database, which means you can create a single Post Card template and use it to showcase multiple pieces of content, like blog posts, product displays, or portfolio posts, without needing to recreate the design each time.
The design of an Avada Post Card is highly flexible, allowing you to customize facets such as layout, typography, colors, and images to match your website’s overall aesthetic. Avada also offers pre-built Post Cards through Avada Studio, which you can easily import and modify to fit your needs, or you can choose to create a Post Card from scratch using the Avada Live VisualBuilder.
Getting Started: Create a New Library Element
Log into the WordPress Dashboard and navigate to the Avada Builder Library. This is where all postcards are created. Here, you’ll select “Post Card” as the element type, give it a suitable name like “New Blog Post Card,” (or whatever), and then click on “Create Library Element.”—This will open the Avada Builder, ready for you to start customizing the Avada Post Card.

However, instead of building a Post Card from scratch, you can leverage the prebuilt content available in Avada Studio. To do this, head over to the Library tab in the toolbar and then to the Studio tab. Avada Studio offers 574 prebuilt content blocks, of which there are 30 prebuilt Post Cards to choose from. Each is designed for various niche purposes, making finding one that suits your needs easy.
Selecting and Importing a Prebuilt Post Card
We are working on a blog for this example, so filtering by the blog category will narrow the options to eight Post Cards. After browsing the available options, you might select the “Travel Postcard” as a starter template.

Before importing, you can preview the postcard and adjust the import settings. The import settings allow you to:
Once your preferred options are set, import the prebuilt Post Card into the Avada Builder library. For a detailed breakdown of the Avada Studio content import options, please see this help file.
Customizing the Prebuilt Post Card Design
After importing, the Post Card will load in the Avada Builder, where you can customize it further to fit your website’s style. For instance, if the template includes a featured image with a custom aspect ratio and mask, you can modify these settings to better match your site’s aesthetic.
Below is a step-by-step of a few standard adjustments we made for our website:
Further customization might involve adding a Content Element under the title to display an excerpt with a specified length and a Drop Cap or editing the button design to match your site’s style. As always, feel free to customize content like this as much or as little as you prefer.
Finalizing and Adding the Post Card to a Page
Once the Post Card design is finalized, save it and return to the page where you want to display it—such as an Articles page on your website. After refreshing the page, you can select your newly created Post Card from the Post Card Element options.

To ensure a consistent layout across your site, you might need to make additional adjustments, such as setting the alignment to “Stretch” on the Design tab or adding a Separator Element with a Flex-grow setting to balance spacing.
Summary
Avada Studio content is an excellent means for quickly adding visually appealing and professionally designed content to any stage of your website’s development. As with the examples explored in this article, Avada Post Cards are intended to work right out of the box. You have the flexibility to customize the content to suit your specific needs, making your website stand out.
Avada Studio is an expansive library of multi-use content blocks professionally designed to speed up your web design workflow. In addition, Avada’s intuitive interface makes it easy for you to live preview any content before importing directly into your content with a click.
The Avada Studio is, by design, a creative resource for anyone building a website with Avada and is intended to give you a head start when creating website content and layouts.
Newly Released Studio Content Blocks
This collection showcases the most recent content blocks released by our team and follows from this previous article [COLLECTION 24]. All content is ready to import into your website with a click of a button.
It is essential to note that you are not limited to how and where the content can be used within your Avada website with each content item being very flexible and ready integrate into your layouts.
Templates
Headers
Content
Containers
Post Cards
Off Canvas
Mega Menus
Studio content is neatly organized into a range of categories making it straightforward to search through, view, and then import into your workflow.
The Benefits Of Prebuilt Content
Studio content is prebuilt for anyone creating a website with the Avada Website Builder. All content is effortlessly customizable and intended to integrate into your website content and layouts seamlessly.
How To Get Started
Accessing and importing prebuilt content is straightforward if you are already using Avada for your website, and it is done via the WordPress Dashboard. We encourage you to take look at this detailed help file and video explaining how to use the Avada Studio.
If you are new to WordPress and want to explore the power to build a successful website with the Avada Website Builder and prebuilt content, you can do so here.
Avada Studio is an expansive library of multi-use content blocks professionally designed to speed up your web design workflow. In addition, Avada’s intuitive interface makes it easy for you to live preview any content before importing directly into your content with a click.
The Avada Studio is, by design, a creative resource for anyone building a website with Avada and is intended to give you a head start when creating website content and layouts.
Newly Released Studio Content Blocks
This collection showcases the most recent content blocks released by our team and follows from this previous article [COLLECTION 23]. All content is ready to import into your website with a click of a button.
It is essential to note that you are not limited to how and where the content can be used within your Avada website with each content item being very flexible and ready integrate into your layouts.
Templates
Headers
Footers
Containers
Icons
Off Canvas
Studio content is neatly organized into a range of categories making it straightforward to search through, view, and then import into your workflow.
The Benefits Of Prebuilt Content
Studio content is prebuilt for anyone creating a website with the Avada Website Builder. All content is effortlessly customizable and intended to integrate into your website content and layouts seamlessly.
How To Get Started
Accessing and importing prebuilt content is straightforward if you are already using Avada for your website, and it is done via the WordPress Dashboard. We encourage you to take look at this detailed help file and video explaining how to use the Avada Studio.
If you are new to WordPress and want to explore the power to build a successful website with the Avada Website Builder and prebuilt content, you can do so here.
Avada Studio is an expansive library of multi-use content blocks professionally designed to speed up your web design workflow. In addition, Avada’s intuitive interface makes it easy for you to live preview any content before importing directly into your content with a click.
The Avada Studio is, by design, a creative resource for anyone building a website with Avada and is intended to give you a head start when creating website content and layouts.
Newly Released Studio Content Blocks
This collection showcases the most recent content blocks released by our team and follows from this previous article [COLLECTION 22]. All content is ready to import into your website with a click of a button.
It is essential to note that you are not limited to how and where the content can be used within your Avada website with each content item being very flexible and ready integrate into your layouts.
Templates
Containers
Elements
Icons
Off-Canvas
Studio content is neatly organized into a range of categories making it straightforward to search through, view, and then import into your workflow.
The Benefits Of Prebuilt Content
Studio content is prebuilt for anyone creating a website with the Avada Website Builder. All content is effortlessly customizable and intended to integrate into your website content and layouts seamlessly.
How To Get Started
Accessing and importing prebuilt content is straightforward if you are already using Avada for your website, and it is done via the WordPress Dashboard. We encourage you to take look at this detailed help file and video explaining how to use the Avada Studio.
If you are new to WordPress and want to explore the power to build a successful website with the Avada Website Builder and prebuilt content, you can do so here.
Avada Studio is an expansive library of multi-use content blocks professionally designed to speed up your web design workflow. In addition, Avada’s intuitive interface makes it easy for you to live preview any content before importing directly into your content with a click.
The Avada Studio is, by design, a creative resource for anyone building a website with Avada and is intended to give you a head start when creating website content and layouts.
Newly Released Studio Content Blocks
This collection showcases the most recent content blocks released by our team and follows from this previous article [COLLECTION 21]. All content is ready to import into your website with a click of a button.
It is essential to note that you are not limited to how and where the content can be used within your Avada website with each content item being very flexible and ready integrate into your layouts.
Page Title Bars
Content
Containers
Post Cards
Off Canvas
Studio content is neatly organized into a range of categories making it straightforward to search through, view, and then import into your workflow.
The Benefits Of Prebuilt Content
Studio content is prebuilt for anyone creating a website with the Avada Website Builder. All content is effortlessly customizable and intended to integrate into your website content and layouts seamlessly.
How To Get Started
Accessing and importing prebuilt content is straightforward if you are already using Avada for your website, and it is done via the WordPress Dashboard. We encourage you to take look at this detailed help file and video explaining how to use the Avada Studio.
If you are new to WordPress and want to explore the power to build a successful website with the Avada Website Builder and prebuilt content, you can do so here.